User Guide
ConText is a desktop app that allows for managing contacts quickly via text commands. It is optimized for use via an in-app Command Line Interface (CLI), while still having the benefits of a Graphical User Interface (GUI).
It has useful features relevant to NUS SoC students:
- Tagging contacts by category: You can tag your professors and classmates with custom tags such as “prof”, “friend”, “CS2103 course” etc., then filter by tag to view all contacts with a certain tag.
- Storing different ways to reach people: By adding alternate contact details, you could have Telegram, Discord, mobile phone, house phone etc. all in the same contact.
- Works like a usual CLI: You can use the up/down arrow keys to switch between previously-entered commands, making entering and repeating commands (e.g. adding many new contacts) easier.
If you can type fast, prefer typing, and are reasonably comfortable with CLI inputs, ConText can let you manage contacts faster than traditional GUI apps.
Quick start
-
Ensure you have Java 11 or above installed.
-
Download the latest
context.jarhere. -
Place the JAR file in the folder you want to use as the app’s home folder.
-
Open a command terminal,
cdinto the folder you put the JAR file in, and use thejava -jar context.jarcommand to run the application.
A window should open with a GUI similar to the one below. Note how the app starts off with some sample data.
-
The text box at the top of the window should be automatically selected. This is where you can type your text commands. Press Enter to execute them.
The feedback from each command’s execution will be displayed below the text box, with the currently displayed list of contacts below that. -
Refer to the Features section below to find out about the various commands.
clear command to delete all the sample data, and start adding your own contacts!
Features
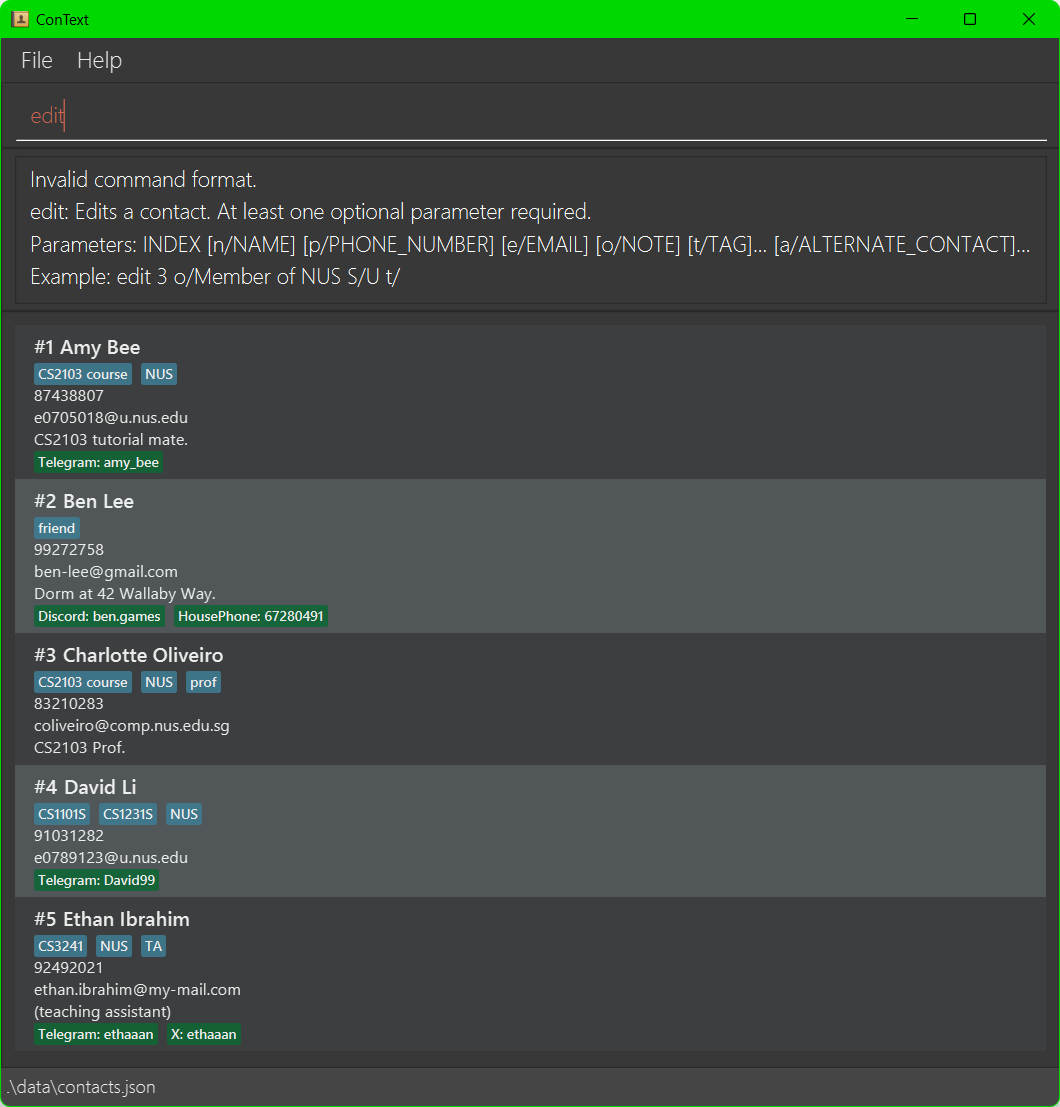
At a glance: the information that can be stored with each contact, and how it will appear in the application, is labelled below.

![]() About the command format:
About the command format:
-
Some commands take in parameters. e.g. in
add n/NAME, theaddcommand takes in ann/parameter. -
Words in
UPPER_CASEare placeholders for values to be specified.
e.g. inedit INDEX, you should specify anINDEXsuch asedit 1.
e.g. inadd n/NAME, you should specify aNAMEsuch asadd n/John Doe. -
Parameters in square brackets are optional.
e.g inn/NAME [o/NOTE], you could specifyn/John Doe o/Good at SE., or justn/John Doe.
-
Parameters with
… after them can be specified multiple times.
e.g. in[t/TAG]…, which is optional but can also be specified multiple times, you could specifyt/NUS,t/NUS t/CS2103 courseetc. -
Parameters can be specified in any order.
e.g. inn/NAME p/PHONE_NUMBER, the orderp/PHONE_NUMBER n/NAMEalso works. -
Extra words for commands that do not take any parameters (such as
listorhelp) will be ignored.
e.g.list 10 n/John Doe z/Extrawill be interpreted as justlist. -
If you are using the PDF version of this user guide, be careful when copy-pasting commands that span multiple lines. Spaces surrounding line breaks may get omitted when copied over to the app.
Adding a contact: add
Adds a new contact.
Note that contacts are identified by their name in ConText, and contacts with exactly the same name (including casing) are considered the same contact. Hence, you will not be able to add a new contact with the same name as an existing contact.
For example, if you already have a contact with name John Doe, you will not be able to add another contact with the same name John Doe.
For two names to be considered the same, they must be identical in every way, and that includes casing, as well as whitespace in the middle of the name, etc.
Therefore, you may add another contact with name John doe, John Doe, or Alex John Doe.
You may also first modify the name of the existing contact.
Should you need to make changes to an existing contact, use the edit command as explained below.
Format:
add n/NAME p/PHONE_NUMBER e/EMAIL [o/NOTE] [t/TAG]... [a/ALTERNATE_CONTACT]...
ALTERNATE_CONTACT
![]() About tags:
About tags:
- Duplicate tags are only counted once.
- Specifying empty tags (
t/with no value) is not allowed when adding contacts. If you wish to specify no tags, you may simply leave out thet/parameter.
![]() About the alternate contact format:
About the alternate contact format:
- The format for
ALTERNATE_CONTACTisTYPE: USERNAME, roughly looking likeSocialMedia: Username. Ensure to include a space between the colon:and theUsername. - Do note at this moment whitespace is not supported for
TYPEandUSERNAME.USERNAMEonly supports alphanumerics and some special characters.,_and-. - Specifying empty alternate contacts (
a/with no value) is not allowed when adding contacts. If you wish to specify no alternate contacts, you may simply leave out thea/parameter.
Examples:
-
add n/John Doe p/98765432 e/john.doe@email.com(Adds a contact with the nameJohn Doe, phone98765432and emailjohn.doe@email.com) -
add n/John Doe p/98765432 e/john.doe@email.com o/Likes SE. t/NUS t/CS2103 course a/Telegram: JohnDoe(Adds a contact with the nameJohn Doe, phone98765432, emailjohn.doe@email.com, noteLikes SE., tagsNUSandCS2103 courseand alternate contactTelegram: JohnDoe)
Editing a contact: edit
Edits an existing contact at the specified INDEX.
Format:
edit INDEX [n/NAME] [p/PHONE_NUMBER] [e/EMAIL] [o/NOTE] [t/TAG]... [a/ALTERNATE_CONTACT]...
INDEX refers to the index number currently shown in the displayed contact list (#1, #2, #3 etc.).
Indices must be a positive integer to be valid (1, 2, 3 etc.), and must exist in the displayed contact list.
Contacts are 1-indexed, that is, the first contact has index number 1. Index number 0 is not valid.
-
At least one of the optional parameters must be specified.
-
Each specified parameter will have its new value(s) replace all existing value(s) for that parameter.
e.g.edit 1 n/The Mythwill edit the name of contact #1toThe Myth, without changing any other parameter values for that contact.- When editing tags, the new specified tag(s) will similarly replace all existing tag(s).
You can specify no tags (i.e. clear all tags) via a singlet/without a value. - Likewise, when editing alternate contacts, you can specify no alternate contacts (i.e. clear all alternate contacts) via a single
a/without a value.
- When editing tags, the new specified tag(s) will similarly replace all existing tag(s).
Examples:
-
edit 1 p/87654321 e/jane_doe@nus.edu.sg(Edits the phone number and email address of contact #1to87654321andjane_doe@nus.edu.sgrespectively.) -
edit 3 o/Member of NUS S/U t/(Edits the note of contact #3toMember of NUS S/Uand clears any of its existing tags.)
Deleting contacts: delete
Deletes the contact(s) at the specified INDEX or indices.
Format:
delete INDEX...
-
You can delete multiple contacts at once by specifying multiple indices separated by spaces.
- Duplicate indices are only counted once.
e.g.delete 1 1will only delete the contact at index #1. - Invalid indices will cause abortion of the delete command.
Examples:
-
delete 1(Deletes the contact at index #1.) -
delete 1 3 5(Deletes the contacts at indices #1, #3, and #5.)
Clearing all contacts: clear
Format:
clear
Listing all contacts: list
Shows all contacts.
Format:
list
Finding by name: find
Shows contacts whose names have a word that fully matches any of the specified keywords.
Format:
find KEYWORD...
-
The search is case-insensitive.
e.g. Keywordjohnwill match the nameJohn. -
The order of the keywords does not matter.
e.g. KeywordsAmy Johnwill show the same contacts as keywordsJohn Amy. -
Only full words will be matched.
e.g. KeywordJohnwill not match the namesJohnnyorJo. -
Each name only needs one word to fully match at least one keyword (i.e.
ORsearch).
e.g.find Bee Johnwill match the namesAmy BeeandJohn Doe.
Examples:
find Johnfind amy Ben CHARLOTTE
Filtering by tag: filter
Shows contacts with a tag that fully matches the specified tag (case-insensitive).
Format:
filter TAG
-
The search is case-insensitive.
e.g.filter friendwill match the tagFriend. -
Only full tags will be matched.
e.g.filter Friwill not match the tagFriend.
e.g.filter Friendwill not match the tagClose Friend. -
The keyword can contain spaces.
e.g.filter Close Friendwill match the tagClose Friend(and this tag only).
e.g.filter Close⠀⠀⠀⠀⠀⠀⠀⠀Friendwill not match the tagClose Friend. -
In summary,
filterlooks for tags which are an exact match, ignoring casing only.
Examples:
filter NUSfilter CS2103 course
Viewing help: help
Opens a subwindow with a convenient link to the user guide.
Format:
help
Alternatively, you can press F1 or click Help → Help in the top toolbar.
Exiting the app: exit
Exits the app.
Format:
exit
Alternatively, you can click File → Exit in the top toolbar.
Automatic sorting
The displayed contact list is always automatically sorted in ascending alphabetical order, regardless of capitalization.
Automatic saving
Your contacts get automatically saved to the file system after each successful command execution. There is no need to save manually.
Editing the data file
ConText data are saved automatically as a JSON file [JAR file location]/data/contacts.json. Advanced users are welcome to update data directly by editing that data file.
FAQ
Q: How do I transfer my data to another Computer?
A: Install the app in the other computer and overwrite the empty data file it creates with the file that contains the data of your previous ConText home folder.
Command summary
| Action | Command Format | Example Usage |
|---|---|---|
| Adding a contact | add n/NAME p/PHONE_NUMBER e/EMAIL [o/NOTE] [t/TAG]... [a/ALTERNATE_CONTACT]... |
add n/John Doe p/98765432 e/john.doe@email.com |
add n/John Doe p/98765432 e/john.doe@email.com o/Likes SE. t/NUS t/CS2103 course a/Telegram: JohnDoe |
||
| Editing a contact | edit INDEX [n/NAME] [p/PHONE_NUMBER] [e/EMAIL] [o/NOTE] [t/TAG]... [a/ALTERNATE_CONTACT]... |
edit 1 p/87654321 e/jane_doe@nus.edu.sg |
edit 3 o/Member of NUS S/U t/ |
||
| Deleting contacts | delete INDEX... |
delete 1 |
delete 1 3 5 |
||
| Clearing all contacts | clear |
clear |
| Listing all contacts | list |
list |
| Finding by name | find KEYWORD... |
find John |
find amy Ben CHARLOTTE |
||
| Filtering by tag | filter TAG |
filter NUS |
filter CS2103 course |
||
| Viewing help | help |
help |
| Exiting the app | exit |
exit |
Known limitations
-
Long contact details are not in the product’s scope.
e.g. names/phone numbers/emails/notes/tags/alternate contacts with hundreds of characters.
Such long text is likely to get shortened with ellipses (...) or cut off by the app’s window.
You may try to remedy this by resizing the app’s window to be wider. -
Multiple monitors are not in the product’s scope.
When using multiple monitors, if you move the app’s window to a secondary monitor, then later switch to using just the primary monitor, the GUI will reopen off-screen.
You can remedy this by deleting thesettings.jsonfile created by the app before running the app again.